
Deploy a Bevy Game to Android and Publish to Itch.io with WASM
Edit (2025) - See how to deploy to Android with Bevy 0.15.
Bevy
Bevy is a game engine written in Rust.
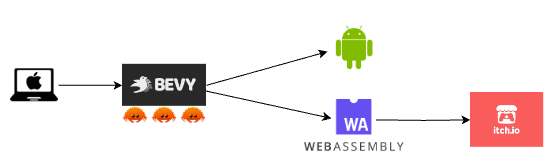
Here, I’m going to be working on an app that can deploy to multiple platforms (specifically Android and Itch.io with WASM). IOS is possible as well, but I didn’t have a device to test on.
I like to have a good development pipeline in place before doing too much work on the actual application, so let’s make sure we can deploy to our phone and itch.io.
In this post, we’ll use a customized version of the breakout example from the bevyengine project.
Git repository
https://github.com/hortonew/bevy_breakout_example
Deploy to Android
Android Studio
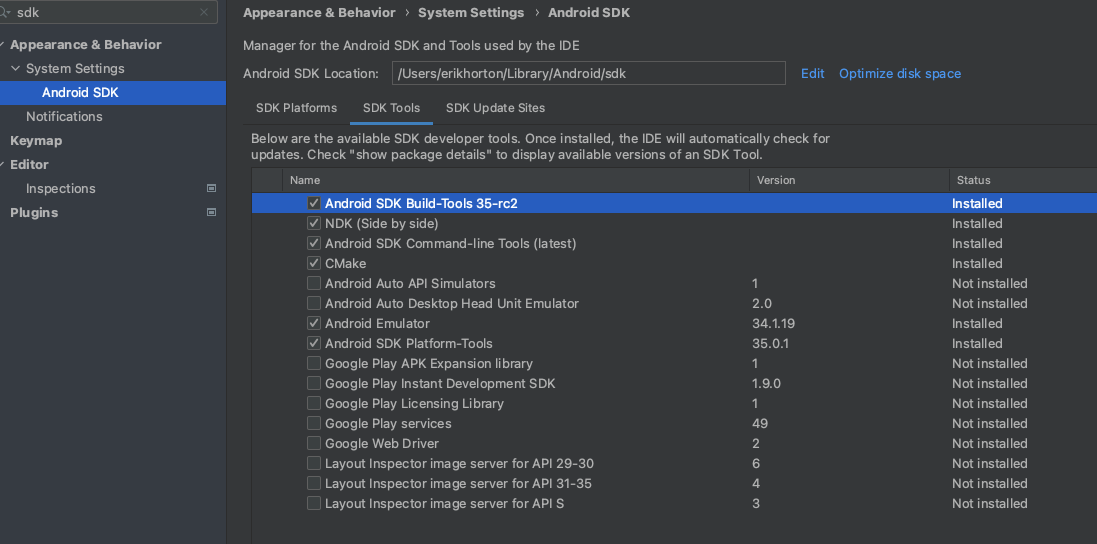
Install Android Studio. Then, go to Android Studio -> Settings -> Appearance and Behavior -> System Settings -> Android SDK.
- Install these SDK Platforms

- Install these SDK tools
Dependencies
- Install Rust. You’ll need to install rust using sh.rustup.rs (installing with brew will lead to issues later).
- Set up the following dependencies:
# If you already installed rust with brew: brew uninstall rust
# Install rust
curl --proto '=https' --tlsv1.2 -sSf https://sh.rustup.rs | sh
# Install xbuild so you can use "x doctor" to view missing dependencies
cargo install xbuild # or: cargo install --git https://github.com/NiklasEi/xbuild
cargo install cargo-apk
rustup target add aarch64-linux-android armv7-linux-androideabi
rustup target add wasm32-unknown-unknown
# Make sure your environment and path are updated to use your Android SDK/NDK locations
# These locations will vary on your system
# Add them into your respective dot file (.bashrc / .zshrc)
export ANDROID_HOME=/Users/$USER/Library/Android/sdk
export NDK_HOME=$ANDROID_HOME/ndk/26.2.11394342
export PATH="/opt/homebrew/opt/llvm/bin:$PATH"
export PATH=$NDK_HOME/toolchains/llvm/prebuilt/darwin-x86_64/bin:$PATH
# Install the dependencies called out by x doctor
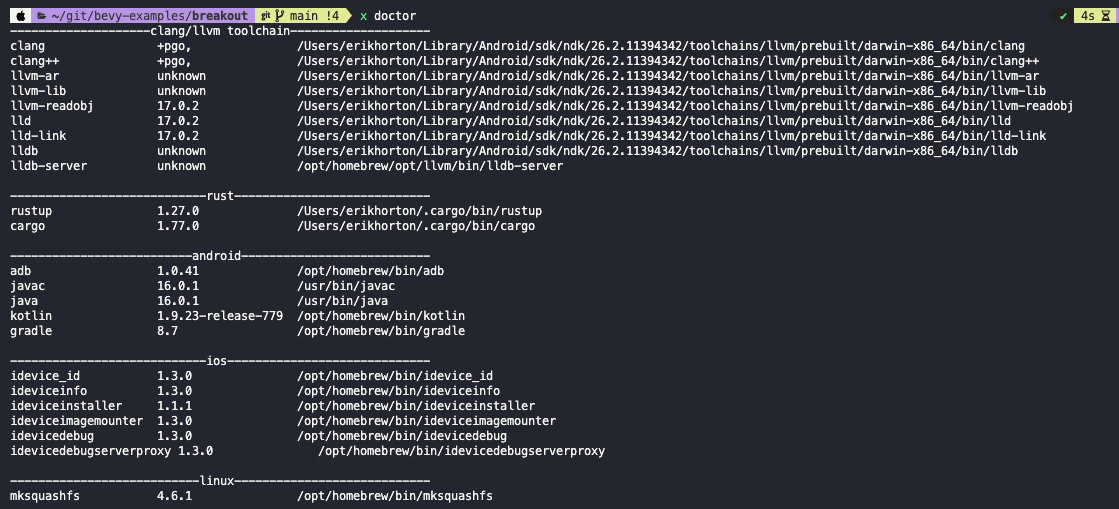
x doctor # to see what's missing
brew install --cask adoptopenjdk
brew install kotlin gradle llvm squashfs ideviceinstaller android-platform-tools # to appease x doctor
x doctor # confirm all dependencies have been installed
Here’s what my output looks like:
Once all the dependencies are set up, navigate into your Rust project.
Using the Bevy example for Breakout, I built a new project and added the example into src/lib.rs to test this all out.
cargo new breakout && cd breakout
cargo build --target aarch64-linux-android
Structure
Note: You’re going to want all your Bevy code accessible from lib.rs (cdylib). This enables all code to be generated into a dynamic system library (instead of an executable from a bin crate).
Update Cargo.toml with lib, bin, package.metadata.android, package.metadata.android.sdk, and package.metadata.android.application. Be sure to replace breakout with your crate name.
# Cargo.toml
[package]
name = "breakout"
version = "0.1.0"
edition = "2021"

[dependencies]
bevy = "0.13.1"

[lib]
name = "breakout"
path = "src/lib.rs"
crate-type = [
    "staticlib",
    "cdylib",    # needed for Android
    "rlib",      # rlib needed for running locally
]

[[bin]]
name = "breakout"
path = "src/main.rs"

[package.metadata.android]
package = "org.breakout.example"
apk_name = "breakout"
strip = "strip"
# see https://github.com/rust-mobile/cargo-apk
assets = "assets"
build_targets = ["aarch64-linux-android", "armv7-linux-androideabi"]

[package.metadata.android.sdk]
target_sdk_version = 31

[package.metadata.android.application]
label = "Bevy Breakout"

# This is for quick testing, used for debug builds
[package.metadata.android.signing.release]
path = "~/.android/debug.keystore"
keystore_password = "android"
main.rs will look like the following. You’ll want to be able to still run your code from your computer, so while we need the game logic all built from lib.rs, we’ll still have a path to call it from our main.rs binary app.
// main.rs
fn main() {
    breakout::run_game();
}
lib.rs will look something like the following. We apply the attribute #[bevy_main] to our private main() function. We have a public run_game() function that is called by main.rs. This file is referenced under [lib] in Cargo.toml
// lib.rs

use bevy::prelude::*

// must be included and must apply to main function
#[bevy_main]
fn main() {
    run_game();
}

// callable from here as well as main.rs
pub fn run_game() {
    App::new()
        .add_plugins(DefaultPlugins)
        // all your plugins, resources, systems
        // ...
        .run();
}
Run it
All commands will have an example make command above them as well, configured by this Makefile.
On your computer:
# make run
cargo run
On Android:
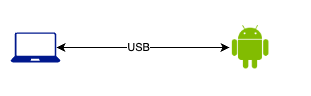
This will deploy the app to the phone and try to run it.
Note: If the app appears to open but doesn’t do anything, close it and open it from the app menu.
# make run_on_android
cargo apk run -p [crate] --lib  # e.g. cargo apk run -p breakout --lib
Alternatively, you can also run it on android with xbuild directly.
x devices # to find your device id
# or adb devices
x run --device adb:[your Android device id] -p [crate]  # e.g. x run --device adb:2A310DLH20002L -p breakout
Release it
This will produce an APK in ./target/debug/apk/[crate].apk.
# make apk_release_debug
x build --release --platform android --store play # Produces an APK in
Alternatively, release it using the signing key called out in Cargo.toml. This will produce an APK in ./target/release/apk/[crate].apk.
# make apk_release
cargo apk build -p [crate] --release --lib # e.g. cargo apk build -p breakout --release
Makefile
This Makefile attempts to simplify some of the commands and sequences above when building/releasing.
Makefile
APK_NAME := $(shell grep 'apk_name' Cargo.toml | awk -F '"' '{print $$2}')
PKG_NAME := $(shell grep '^name = ' Cargo.toml | awk -F '"' '{print $$2}' | head -n 1)

setup:
	cargo install xbuild
	cargo install cargo-apk
	brew install --cask adoptopenjdk
	brew install kotlin gradle llvm squashfs ideviceinstaller
	rustup target add aarch64-linux-android armv7-linux-androideabi
	x doctor

run:
	cargo run

# cargo build --target aarch64-linux-android
build:
	cargo build

run_on_android:
	cargo apk run -p $(APK_NAME) --lib

apk_release_debug:
	x build --release --platform android --store play

apk_release:
	cargo apk build -p $(APK_NAME) --release --lib

npx:
	npx serve webbuild

wasm_run:
	cargo build --release --target wasm32-unknown-unknown
	rm -rf ./webbuild/out/
	rm -rf ./webbuild/assets/
	wasm-bindgen --out-dir ./webbuild/out --target web ./target/wasm32-unknown-unknown/release/$(PKG_NAME).wasm
	cp -r assets ./webbuild/
	npx serve webbuild

wasm_release:
	cargo build --release --target wasm32-unknown-unknown
	rm -rf ./webbuild/out/
	rm -rf ./webbuild/assets/
	wasm-bindgen --out-dir ./webbuild/out --target web ./target/wasm32-unknown-unknown/release/$(PKG_NAME).wasm
	cp -r assets ./webbuil  d/
	rm -f webbuild.zip
	zip -r webbuild.zip webbuild
Deploy with WebAssembly (WASM)
- Create directory
webbuildwithindex.htmlinside. - Copy the contents of index.html below into this file. It’s important that all URLs are relative paths if you want this to work on itch.io.
index.html
<html>
  <head>
    <meta charset="UTF-8" />
    <style>
      body {
        margin: 0;
        background: darkgrey;
        background-size: 400% 400%;
        animation: gradient 15s ease infinite;
        height: 100vh;
        display: flex;
        justify-content: center;
        align-items: center;
      }
      .loader {
        border: 16px solid #f3f3f3;
        border-radius: 50%;
        border-top: 16px solid #3498db;
        width: 120px;
        height: 120px;
        position: absolute;
        z-index : -999;
        -webkit-animation: spin 2s linear infinite;
        animation: spin 2s linear infinite;
      }

      @-webkit-keyframes spin {
        0% { -webkit-transform: rotate(0deg); }
        100% { -webkit-transform: rotate(360deg); }
      }

      @keyframes spin {
        0% { transform: rotate(0deg); }
        100% { transform: rotate(360deg); }
      }
      </style>
  </head>
  <body>
    <div class="loader"></div>
    <script>
        // the following function keeps track of all AudioContexts and resumes them on the first user
        // interaction with the page. If the function is called and all contexts are already running,
        // it will remove itself from all event listeners.
        (function () {
            // An array of all contexts to resume on the page
            const audioContextList = [];

            // An array of various user interaction events we should listen for
            const userInputEventNames = [
                "click",
                "contextmenu",
                "auxclick",
                "dblclick",
                "mousedown",
                "mouseup",
                "pointerup",
                "touchend",
                "keydown",
                "keyup",
            ];

            // A proxy object to intercept AudioContexts and
            // add them to the array for tracking and resuming later
            self.AudioContext = new Proxy(self.AudioContext, {
                construct(target, args) {
                    const result = new target(...args);
                    audioContextList.push(result);
                    return result;
                },
            });

            // To resume all AudioContexts being tracked
            function resumeAllContexts(_event) {
                let count = 0;

                audioContextList.forEach((context) => {
                    if (context.state !== "running") {
                        context.resume();
                    } else {
                        count++;
                    }
                });

                // If all the AudioContexts have now resumed then we unbind all
                // the event listeners from the page to prevent unnecessary resume attempts
                // Checking count > 0 ensures that the user interaction happens AFTER the game started up
                if (count > 0 && count === audioContextList.length) {
                    userInputEventNames.forEach((eventName) => {
                        document.removeEventListener(eventName, resumeAllContexts);
                    });
                }
            }

            // We bind the resume function for each user interaction
            // event on the page
            userInputEventNames.forEach((eventName) => {
                document.addEventListener(eventName, resumeAllContexts);
            });
        })();
    </script>
    <script type="module">
        import init from './out/project_name_here.js'
        init();
    </script>
</body>
</html>
# make wasm_run
rustup target add wasm32-unknown-unknown  # should have been done previously
cargo install -f wasm-bindgen-cli  # or see https://crates.io/crates/wasm-server-runner
cargo build --release --target wasm32-unknown-unknown
wasm-bindgen --out-dir ./webbuild/out/ --target web ./target/wasm32-unknown-unknown/release/breakout.wasm
cp -r assets ./webbuild/
# Copy the contents of index.html (see below), then run the following to replace project_name_here with your crate name from Cargo.toml
PKG_NAME=$(grep '^name = ' Cargo.toml | awk -F '"' '{print $2}' | head -n 1)
sed -i '' "s/\/out\/project_name_here.js/\/out\/${PKG_NAME}.js/g" webbuild/index.html
npx serve webbuild  # then navigate to http://localhost:3000
Upload to itch.io
Here’s my deployed example @erikhorton.itch.io.
- Create a zip file from your webbuild directory (right click -> compress, or
zip -r webbuild.zip webbuild) - Go to your itch.io dashboard -> Create new project
- Upload your .zip file -> save & view page

Troubleshooting Audio
If your audio (or other assets) doesn’t work, or any resource for that matter, you have a couple options. See this issue or this thread for more info.
Option 1:
use bevy::asset::AssetMetaCheck; with .insert_resource(AssetMetaCheck::Never) before loading the DefaultPlugins
// Example: Option 1
use bevy::asset::AssetMetaCheck;
use bevy::prelude::*

#[bevy_main]
fn main() {
    run_game();
}

pub fn run_game() {
    App::new()
        .insert_resource(AssetMetaCheck::Never)
        .add_plugins(DefaultPlugins)
        .add_systems(Startup, setup)
        .run();
}

pub fn setup(mut commands: Commands, asset_server: Res<AssetServer>,) {
    let ball_collision_sound = asset_server.load("sounds/breakout_collision.ogg");
    commands.insert_resource(CollisionSound(ball_collision_sound));
}
Option 2:
Use bevy_embedded_assets crate (cargo add bevy_embedded_assets). Assets will be prefaced with embedded://.
// Example: Option 2
use bevy::prelude::*
use bevy_embedded_assets::EmbeddedAssetPlugin;

#[bevy_main]
fn main() {
    run_game();
}

pub fn run_game() {
    App::new()
        .add_plugins((EmbeddedAssetPlugin::default(), DefaultPlugins))
        .add_systems(Startup, setup)
        .run();
}

pub fn setup(mut commands: Commands, asset_server: Res<AssetServer>,) {
    let ball_collision_sound = asset_server.load("embedded://sounds/breakout_collision.ogg");
    commands.insert_resource(CollisionSound(ball_collision_sound));
}
The latter lets you embed all assets into your binary, meaning you won’t have to include an assets directory in your zip file. If you don’t want to include a new crate in your project, opt for option 1 which was introduced here https://github.com/bevyengine/bevy/pull/10623/files.
Next steps
- Get a deployment pipeline automated with Github Actions (see link below).
- Add more builds to deploy to other architectures like Windows or Linux.
Resources
Thanks! These people and resources made this post possible.